
It can be super frustrating when your meat thermometer won’t turn on. You’re all set to cook a perfect meal, and then—nothing. This common issue, the Meat Thermometer Battery Not Working Fix, often stumps beginners because the fix seems so simple, yet it’s easy to overlook.
But don’t worry! We’ve got a straightforward, step-by-step guide that will get your thermometer working again in no time. Let’s find out what’s going on.
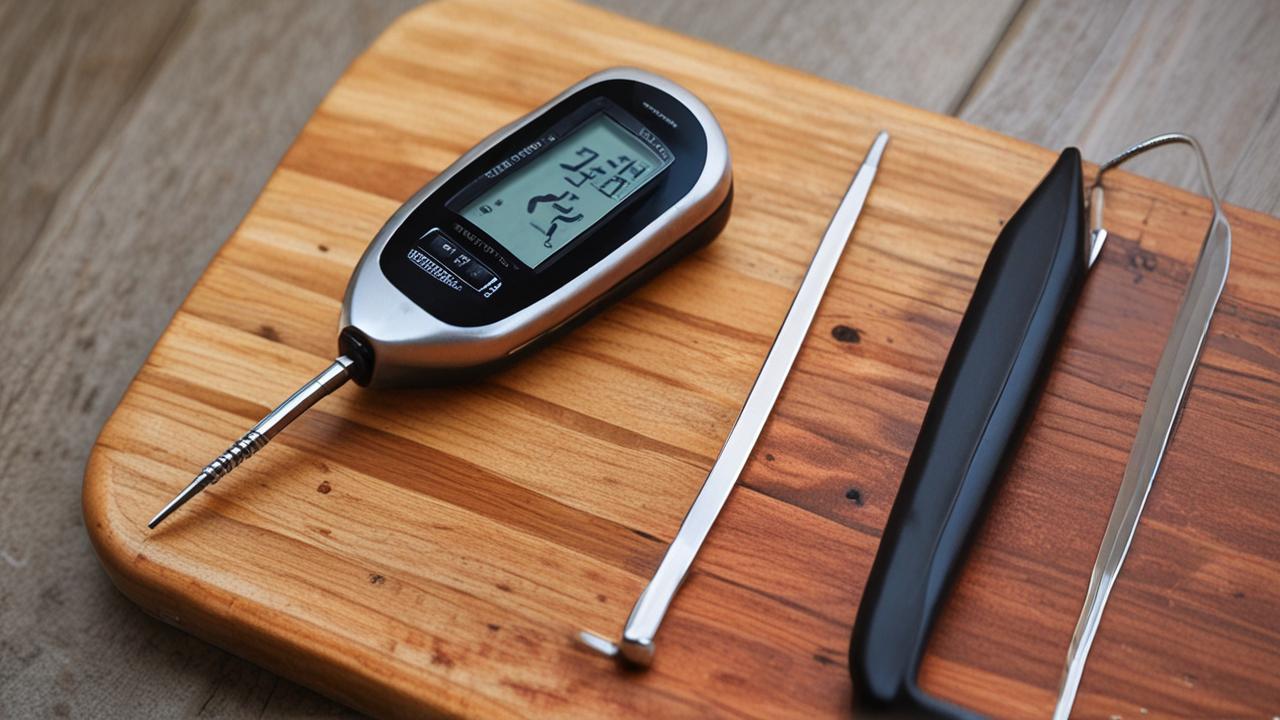
Checking Your Meat Thermometer’s Battery
This section focuses on the most common reason your meat thermometer might not be working: the battery. We’ll explore how to identify battery issues, the different types of batteries used, and the simple steps to replace them. Getting this right is often the quickest solution to your Meat Thermometer Battery Not Working Fix problem.
Understanding Battery Types
Meat thermometers use a few different kinds of batteries. Most digital ones use small, round button cells, like CR2032 or LR44. Some older or simpler models might use standard AA or AAA batteries.
It’s important to know which type your thermometer needs. You can usually find this information in the user manual or sometimes printed near the battery compartment itself. Using the wrong kind of battery won’t work and could even damage your device.
The CR2032 battery is a 3-volt lithium coin cell. It’s popular because it’s small, thin, and provides a decent amount of power for its size. These are great for devices where space is limited, like many digital meat thermometers.
LR44 batteries are also known as AG13 or G13. They are alkaline button cells, typically 1.5 volts. While they are similar in size to CR2032, their voltage is different, and they generally don’t last as long.
Standard AA and AAA batteries are much larger and provide 1.5 volts each. They are commonly used in devices that need more power or have more space for them, such as some older digital meat thermometers or analog models with electronic components.
Why Battery Type Matters
Using the correct battery type is crucial for your thermometer to function properly. If you put in a battery with the wrong voltage, it might not power the device at all. Or, it might power it weakly, leading to inaccurate readings or the device shutting off randomly.
Batteries are designed for specific power outputs and durations.
For instance, trying to power a device designed for a 3-volt CR2032 with a 1.5-volt LR44 battery means the device is receiving half the voltage it expects. This is like trying to run a small fan with a tiny watch battery; it just won’t have enough juice.
Similarly, if your thermometer takes two AA batteries, that’s 3 volts in total. Putting in a single battery that’s too small in voltage won’t bridge that gap. Always check what your manual or device suggests.
- Always double-check the battery type required for your specific meat thermometer.
- Battery size and shape are also important.
- Note the battery’s chemistry (e.g., lithium, alkaline).
This ensures you purchase the correct replacements. Using the wrong battery can lead to the thermometer not working at all, or worse, causing damage to the internal electronics. The user manual is your best friend here, or look for labels around the battery compartment.
Even if you find a battery with the right voltage, if it’s too big or too small to fit securely in the compartment, it won’t make proper contact. This can prevent power from flowing to the device, leading to the classic “Meat Thermometer Battery Not Working Fix” dilemma.
Different battery chemistries have different lifespans and performance characteristics. Lithium batteries, like the CR2032, tend to last longer and perform better in a wider range of temperatures than alkaline batteries.
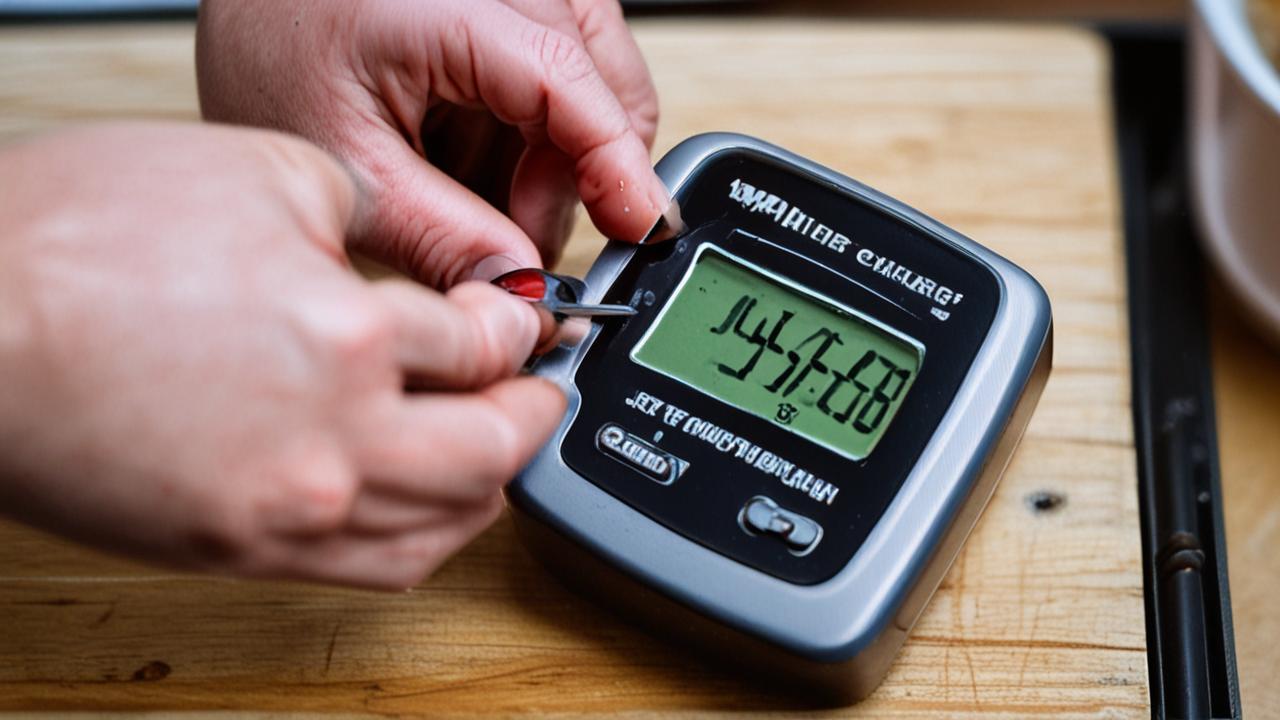
Replacing the Battery
This is the core of solving your Meat Thermometer Battery Not Working Fix. Replacing a battery is usually very simple. First, locate the battery compartment.
It’s often on the back of the thermometer or on the handle. There might be a small screw holding it shut, or it might just snap open.
If there’s a screw, you’ll need a small screwdriver, often a Phillips head. Carefully remove the screw and set it aside in a safe place so you don’t lose it. Then, gently pry open the compartment cover.
If it snaps, you might need to use a fingernail or a plastic tool to gently lift it.
Once the compartment is open, take out the old battery. Pay close attention to how it was placed. There are usually markings inside the compartment, like a plus (+) and minus (-) symbol, indicating which way the battery should face.
Make sure the new battery is oriented correctly. The flat side (usually the positive terminal) often goes up, and the side with bumps or markings (the negative terminal) goes down.
was one. Turn on your thermometer and check if it works.
If it doesn’t, don’t panic; there are other things to check.
For snap-open compartments, you might need to gently push down and slide a tab, or simply use a bit of leverage to pop it open. When closing, make sure it clicks firmly into place to maintain a good seal and connection.
When inserting the new battery, it’s wise to touch both the battery and the metal contacts inside the compartment with a clean, dry cloth. This helps remove any grease or debris that might be interfering with the electrical connection. Sometimes, a tiny bit of moisture or oil from your fingers can cause problems.
Common Battery Compartment Issues
Sometimes, the problem isn’t just the battery itself but the compartment it sits in. Look for any signs of corrosion. Corrosion looks like a powdery, greenish or white residue.
This can happen if a battery leaked or if moisture got into the compartment. Corrosion acts like an insulator, preventing electricity from flowing.
If you see corrosion, you’ll need to clean it. A pencil eraser can sometimes work for light corrosion on the metal contacts. For more stubborn corrosion, you can use a cotton swab dipped in a little bit of white vinegar or lemon juice.
Gently scrub the contacts and the inside of the compartment. Make sure everything is completely dry before putting in a new battery.
Also, check the metal contacts themselves. Are they bent or damaged? They need to have good, firm contact with the battery to conduct electricity properly.
If a contact looks bent out of shape, you might be able to gently bend it back with a small, non-metallic tool, like a plastic toothpick. Be very careful not to break them.
A loose battery can also be an issue. If the battery compartment is worn or damaged, the battery might not be held tightly. This can cause intermittent power or no power at all.
If this is the case, and the compartment is damaged, it might be harder to fix without replacing the whole thermometer.
- Clean the battery contacts if they look dirty or corroded.
- Ensure the battery is seated firmly and correctly.
- Inspect the battery compartment for any visible damage.
A clean connection is essential for the battery to send power to the thermometer. You can use a pencil eraser or a cotton swab lightly dampened with rubbing alcohol for this. Just make sure the contacts are dry before putting in a new battery.
A battery that’s loose or not quite in place won’t make a good connection. Double-check that it’s pressed down firmly against the contacts and that the compartment cover is securely closed.
Cracks or broken pieces in the compartment can prevent a good seal or proper contact, leading to power issues. If the compartment itself is damaged, it might be time to consider a new thermometer.
Troubleshooting Beyond the Battery
If a new battery doesn’t solve your Meat Thermometer Battery Not Working Fix problem, it’s time to look at other possibilities. Sometimes, the issue isn’t with the battery at all, but with other parts of the thermometer. This section explores these less common but still important troubleshooting steps.
Checking the Power Switch and Connections
Some thermometers have a physical on/off switch, while others turn on automatically when you open the probe or press a button. Make sure any physical switch is in the “on” position. If your thermometer has a probe that folds out, ensure it’s fully extended, as this often activates the device.
If it has a button to turn it on, press it firmly.
Inside the battery compartment, check the metal contacts that touch the battery. Are they making proper contact with the battery terminals? Sometimes, these contacts can get bent slightly out of place, or they might have a thin film of grime on them that a simple wipe with a cloth might not remove.
You can try gently scraping the contacts with the edge of a plastic card or a small, non-metallic tool to ensure a good connection.
If your thermometer has a probe that detaches, make sure it’s securely plugged in. A loose connection at the probe can prevent the thermometer from registering any temperature, making it seem like it’s not working at all, even if the battery is fine and the display is on.
For thermometers that are waterproof or water-resistant, check the seal around the probe connection or battery compartment. If this seal is damaged, moisture can get inside and cause electrical shorts or corrosion, leading to malfunctions.
When to Suspect Other Component Failures
If you’ve tried a new battery, cleaned the contacts, and ensured everything is connected properly, but the thermometer still won’t turn on, it’s possible that another component has failed. This is more common in older or heavily used thermometers.
The internal circuitry could be damaged. This might happen due to a drop, exposure to extreme heat or cold, or just wear and tear over time. If you can see any cracks in the casing or if the display looks damaged, it’s a sign that internal components might be affected.
Another possibility is a faulty on/off mechanism. If it’s a button, it might be stuck or broken internally. If it’s a fold-out probe that’s supposed to activate the device, the internal switch mechanism might be faulty.
In some cases, the display itself could be the problem. If you get a faint flicker or no display at all, even with a new battery and good connections, the screen might have failed.
Unfortunately, repairing internal electronic components usually requires specialized tools and knowledge. For most home users, if the simple fixes don’t work, it might be more cost-effective to replace the thermometer than to attempt a complex repair.
- Ensure any on/off switch or button is functional.
- Check the probe connection for security and cleanliness.
- Consider the age and condition of the thermometer.
Sometimes, a button gets stuck or the switch mechanism fails. Try pressing the button multiple times or wiggling the switch gently to see if it responds. If it feels loose or unresponsive, it might be the source of the problem.
If your thermometer has a detachable probe, ensure it’s pushed in all the way. Dirt or moisture in the probe socket can also interfere with its operation. Try cleaning the connector end of the probe and the socket with a dry cloth.
Electronic devices have a lifespan. If your thermometer is several years old and has been through a lot, it’s possible that internal components have simply worn out. A Meat Thermometer Battery Not Working Fix might not be possible if the underlying issue is with the electronics.
Signs of a Dead Thermometer
There are a few signs that your thermometer might be beyond repair. If you’ve
Another sign is if the thermometer turns on but the readings are wildly inaccurate or jump around erratically. This could be a sign of a failing temperature sensor or internal processing unit. While sometimes a faulty sensor can be replaced, it’s often not practical for most consumer-grade thermometers.
If the battery compartment itself is damaged, like a broken latch or cracked housing, it might not be possible to keep the battery properly connected, or it might not be protected from moisture. This can lead to ongoing issues even with new batteries.
Think about how much you use your thermometer and how much a new one would cost. If it’s an inexpensive model and you use it often, it might be more sensible to buy a new one. However, for more advanced or expensive models, further investigation might be worthwhile.
A thermometer that only shows a low battery symbol, even with a brand new battery, is a classic sign of a deeper problem. This symbol often indicates that the device is not receiving enough stable power to operate correctly, which points away from just a dead battery and towards an internal issue.
- Completely blank screen after multiple battery changes.
- Inconsistent or nonsensical temperature readings.
- Visible physical damage to the unit.
If you’ve tried several new, correctly installed batteries and the display is still dead, the problem is likely internal. This suggests the main board or power supply within the thermometer might have failed.
When a thermometer gives readings that are all over the place, or consistently wrong by a large margin, it could mean the temperature sensor or the processor is faulty. This is not usually a battery issue.
Cracks in the casing, a broken probe, or a damaged display are clear signs that the thermometer has sustained damage that could affect its internal workings.
Tips for Battery Longevity and Care
To avoid future Meat Thermometer Battery Not Working Fix situations, taking good care of your thermometer’s battery is key. This section offers practical advice on how to make your batteries last longer and keep your thermometer in good working order.
Proper Storage
When you’re not using your meat thermometer, it’s best to store it properly. If your thermometer has a probe cover, use it. This protects the sensitive probe tip.
More importantly for battery life, if your thermometer has an on/off switch, turn it off. Some thermometers have an auto-shutoff feature, but it’s always a good habit to turn it off manually if possible.
Leaving a thermometer on accidentally is one of the fastest ways to drain a battery. Even if the display isn’t bright, the electronics are still consuming power. Think of it like leaving a small light on in a room; it uses energy even if it’s not the main light.
If you plan to store the thermometer for an extended period (more than a month), it’s a good idea to remove the battery. This prevents any potential leakage from damaging the device, which can happen even with good quality batteries over time. Store the battery separately in a cool, dry place.
Avoid storing your thermometer in extreme temperatures. Very hot places, like inside a car on a sunny day, or very cold places, can degrade batteries faster and potentially harm the electronics. A kitchen drawer or a utensil organizer is usually a good spot.
Maximizing Battery Performance
To get the most out of your batteries, always use high-quality ones. Name brands often perform better and last longer than generic ones, although this isn’t always the case. Check the expiration date on the battery packaging to ensure you’re using fresh batteries.
When using the thermometer, try to get your reading quickly. Don’t leave the probe inserted longer than necessary to get a stable temperature. While modern thermometers are designed for this, prolonged use will naturally use more battery power.
If your thermometer has different settings or modes, make sure you’re using the most appropriate one. Some thermometers might have a low-power mode or a specific setting for certain types of cooking that conserves battery. Read your manual to understand all the features.
Finally, when you replace a battery, make sure the old one is disposed of properly. Many button cell batteries contain materials that should be recycled. Check your local recycling guidelines for battery disposal.
- Turn off the thermometer when not in use.
- Remove the battery for long-term storage.
- Use reputable, fresh batteries.
This is the single most effective way to extend battery life. If your thermometer has an auto-shutoff, don’t rely on it alone; make it a habit to switch it off manually.
If you won’t be using the thermometer for several weeks or months, take the battery out to prevent leakage and preserve battery charge.
High-quality batteries from known brands tend to have more consistent performance and longer shelf lives than cheaper, unknown brands.
Meat Thermometer Battery Not Working Fix: Real-World Examples
Let’s look at some common scenarios where a Meat Thermometer Battery Not Working Fix was needed and how it was resolved. These examples show how simple checks can often save the day.
Scenario 1: The Grilling Enthusiast
Mark loves grilling and had a digital meat thermometer he used almost every weekend. One Saturday, he went to use it for a barbecue, but it wouldn’t turn on. He remembered he’d used it the previous weekend and it was working fine.
He checked the battery compartment. It looked clean, and the battery seemed seated correctly. He grabbed a new CR2032 battery from a pack he had just bought.
After replacing the old battery with the new one, the thermometer sprang to life instantly. It turned out the old battery, while not completely dead, was just weak enough that the thermometer wouldn’t power on properly anymore. This was a classic case where a simple battery replacement, the most basic step in the Meat Thermometer Battery Not Working Fix process, did the trick.
Mark learned that even if a battery still shows some life, it might not be enough for a digital device. He now keeps a spare set of batteries handy for his thermometer.
Scenario 2: The Busy Baker
Sarah was baking a cake for a friend’s birthday. Her instant-read thermometer usually works perfectly, but today, nothing. The display was blank.
She checked the small battery compartment on the back, expecting to find a CR2032. To her surprise, it took two small LR44 batteries.
She found some LR44 batteries in her junk drawer. After replacing the old ones, the thermometer still wouldn’t turn on. Frustrated, she looked closer at the battery compartment.
She noticed a slight greenish powder on one of the metal contacts. She took a pencil eraser and rubbed the contact until it was shiny again. She then inserted new LR44 batteries, ensuring they were in the correct orientation.
The thermometer flickered on! The corrosion had been preventing a proper connection. Sarah realized that even if she had used new batteries, the dirt and corrosion would have stopped the Meat Thermometer Battery Not Working Fix from succeeding.
She made a mental note to clean the contacts periodically.
This scenario highlights that cleaning the battery contacts is just as important as replacing the battery itself. A corroded connection can effectively break the circuit, rendering the device unusable.
Scenario 3: The Camping Trip Surprise
David was on a camping trip and needed to cook some fish. He pulled out his trusty digital thermometer, but it was unresponsive. He had stored it in his backpack with the probe folded in.
He tried pressing the power button, but nothing happened. He opened the battery compartment and saw that the battery looked fine.
He then remembered reading somewhere that some thermometers have a probe that needs to be extended to turn on. He unfolded the probe completely. Immediately, the display lit up.
He had been so focused on the battery that he forgot about the activation mechanism. This was a simple oversight, not a true Meat Thermometer Battery Not Working Fix, but it saved him a lot of worry.
David’s experience is a good reminder to check all the basic operating instructions for your specific thermometer. Sometimes, the simplest solutions are overlooked when we’re focused on a more technical problem like a battery issue.
He also realized that the battery might have been slightly drained because the auto-shutoff feature might not have engaged properly if the probe wasn’t fully extended. This shows how different aspects of a device can interact.
This case underscores the importance of understanding how your specific device works. Features like probe activation and auto-shutoff are designed for convenience and battery saving, but they can also be the source of apparent “malfunctions” if not used correctly.
Statistics on Battery Issues
While specific statistics for meat thermometer battery failures are hard to find, general consumer electronics battery issues are common. A survey by Statista in 2023 indicated that battery problems are among the top reasons consumers report issues with small electronic devices. For instance, approximately 25% of reported problems with portable electronics relate to battery life or functionality.
Another indicator comes from battery manufacturers. Energizer, a major battery producer, states that proper battery installation and clean contacts are critical for optimal performance in nearly 90% of small electronic devices. They also highlight that batteries can lose charge over time even when not in use, with alkaline batteries losing about 2-3% of their charge per year while stored.
This suggests that for a device like a meat thermometer, which might be used intermittently, the battery’s state of charge and the quality of its connection are paramount. A significant portion of “Meat Thermometer Battery Not Working Fix” scenarios likely stem from these simple, correctable issues rather than outright device failure.
| Common Cause | Likelihood of Fixing | Typical Solution |
|---|---|---|
| Dead or low battery | Very High | |
| Dirty or corroded contacts | High | Clean contacts with eraser or alcohol |
| Battery not seated correctly | High | Reinsert battery firmly, check orientation |
| Device not turned on/activated | Medium | Check power switch/probe extension |
| Internal component failure | Low | Repair or replace thermometer |
Frequently Asked Questions
Question: My meat thermometer won’t turn on. What’s the first thing I should do?
Answer: The very first thing you should do is check and
Question: I replaced the battery, but my thermometer still doesn’t work. What’s next?
Answer: Next, check the battery contacts inside the compartment. Look for any dirt, grime, or corrosion. Clean them gently with a pencil eraser or a cotton swab dipped in a little rubbing alcohol.
Ensure the contacts are dry before reinserting the new battery.
Question: How can I tell if my meat thermometer is broken beyond repair?
Answer: If you’ve tried multiple new, correctly installed batteries, cleaned the contacts, and ensured proper connections, and the thermometer remains completely unresponsive (blank screen), it’s likely an internal electronic failure. Visible physical damage to the casing or screen can also be a sign of irreparable damage.
Question: Should I remove the battery if I’m not going to use my thermometer for a while?
Answer: Yes, it’s a good practice to remove the battery if you plan to store the thermometer for an extended period, such as a month or more. This helps prevent battery leakage, which can damage the device, and also ensures the battery doesn’t lose its charge unnecessarily.
Question: What if my thermometer turns on, but the temperature readings are weird?
Answer: If the thermometer powers on but shows inaccurate or fluctuating readings, it’s usually not a battery issue. This could indicate a problem with the temperature sensor itself or the internal electronics. In this case, a Meat Thermometer Battery Not Working Fix won’t help, and you might need to consider a replacement.
Summary
Fixing a meat thermometer that won’t turn on is usually simple. Start by replacing the battery with a fresh, correct one, making sure it’s inserted properly. Clean any contacts if you see dirt or corrosion.
If these steps don’t work, the thermometer may have an internal issue. Proper care, like turning it off and storing it well, helps batteries last longer.


