

Many folks wonder about How to Use Meat Thermometer for Pork Chops. It can seem tricky, especially if you’re new to cooking pork chops perfectly. You want them juicy and safe to eat, but not dry.
Don’t worry! This guide makes it super simple. We’ll walk you through every step, so you’ll be a pro in no time.
Get ready to cook the best pork chops you’ve ever had.
Why Pork Chops Need Precise Cooking
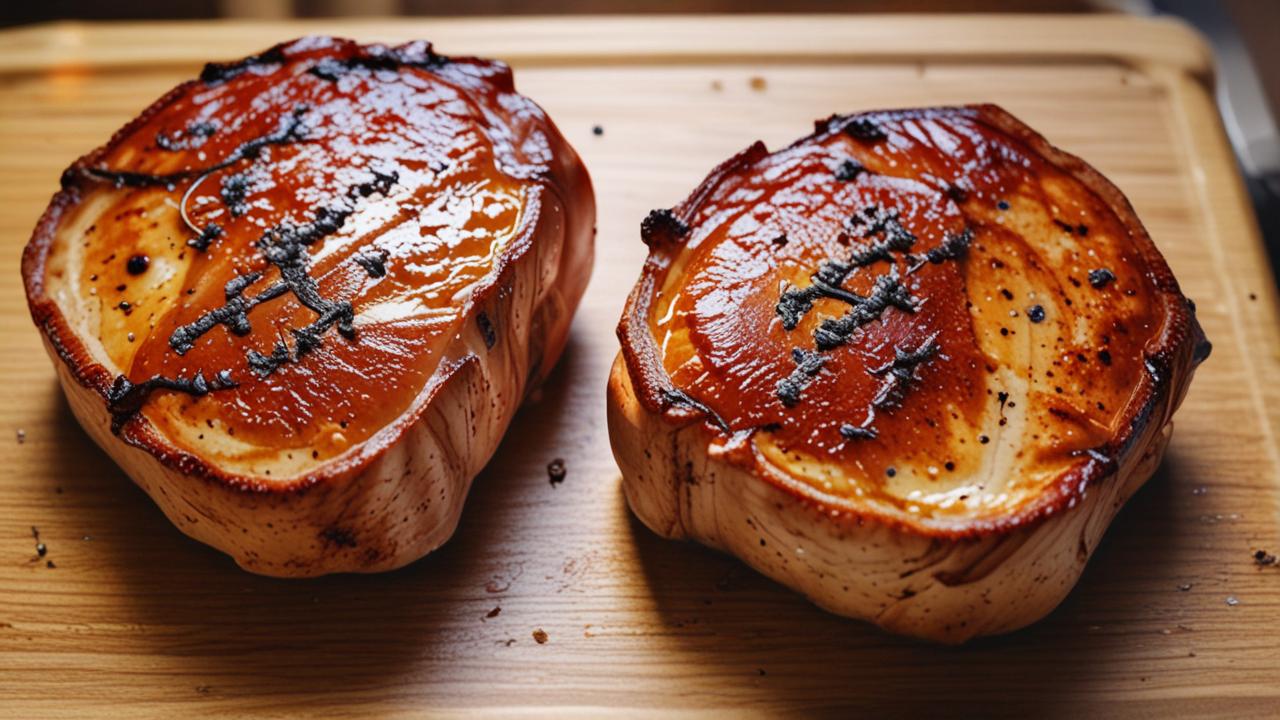
Pork chops are a favorite meal for many, offering a lean and flavorful protein option. However, they can easily go from perfectly cooked to dry and tough if not handled with care. This is where knowing the right way to cook them becomes important.
The goal is to reach a safe internal temperature while keeping the meat moist and tender.
The challenge often lies in judging doneness visually, which can be unreliable. Pork has undergone changes in recommended cooking temperatures over the years, and many people still rely on old guidelines that can lead to overcooking. Modern recommendations aim for a slightly higher internal temperature for better safety and texture.
This section will explore why cooking pork chops correctly is essential for taste and safety. We’ll look at what makes them different from other meats and why a little extra attention makes a big difference. You’ll learn what to aim for and why it matters.
The Importance of Internal Temperature
The internal temperature of meat is the most accurate way to know if it’s safe to eat and cooked just right. For pork chops, this is especially true because pork can carry bacteria like Trichinella spiralis and Salmonella. Cooking pork to the correct internal temperature kills these harmful organisms, making it safe for consumption.
Beyond safety, temperature is the key to texture and flavor. If pork chops are undercooked, they might not be safe and can have an unappetizing texture. If they are overcooked, the lean muscle fibers will seize up, squeezing out all the delicious juices and leaving you with a dry, tough piece of meat.
The ideal internal temperature for pork chops is generally considered to be 145°F (63°C) for medium-rare, with a 3-minute rest time. This temperature ensures safety and results in a juicy, tender chop. This differs from older recommendations that suggested cooking pork until it was well-done, leading to the common perception of pork being dry.
Safe Cooking Temperatures and Guidelines
Food safety organizations, like the USDA, have updated their recommendations for pork to reflect advancements in farming and processing. The current recommendation for pork, including chops, roasts, and tenderloins, is to cook it to an internal temperature of 145°F (63°C).
This temperature achieves a safe level of doneness while still allowing the meat to remain tender and juicy. It’s a balance that many home cooks find difficult to achieve without precise tools. The 3-minute rest time after reaching this temperature is also crucial.
During resting, the juices redistribute throughout the meat, making it more moist and flavorful.
When you take pork chops off the heat, they will continue to cook a little bit due to residual heat. This carryover cooking can raise the temperature by a few degrees. So, pulling the chops off the heat when they reach 140-142°F (60-61°C) and allowing them to rest will bring them up to the safe 145°F (63°C) target.
- Why 145°F? This temperature has been scientifically shown to kill harmful bacteria commonly found in pork. It’s a level that balances safety with maintaining the best possible texture and taste.
- Resting is Key: Don’t skip the rest time. It’s not just an extra step; it’s essential for retaining moisture. Imagine the juices are running around inside the chop, and when you cut too soon, they all run out onto the plate. Resting lets them settle back in.
- Visual Cues Can Deceive: While color used to be a guide, modern pork breeds and farming practices mean that pork can be pink and still be perfectly safe and delicious. Relying solely on color is no longer a reliable indicator of doneness or safety.
Understanding Different Types of Pork Chops
Pork chops are not all the same. The cut of the pork chop significantly impacts its tenderness, flavor, and how it cooks. Understanding these differences will help you choose the right chop for your meal and adjust your cooking method accordingly.
Each type of chop comes from a different part of the pig, and this location dictates the amount of fat and muscle it contains. More marbling (fat within the muscle) generally leads to a more tender and flavorful chop. Leaner chops require more careful cooking to prevent drying out.
When you’re aiming for a perfectly cooked pork chop, knowing which cut you’re working with is the first step. This knowledge helps you predict how long it might take to cook and what internal temperature is ideal for that specific cut.
Key Pork Chop Cuts Explained
The main types of pork chops you’ll find at the butcher or grocery store are the rib chop, loin chop, and sirloin chop. Each has distinct characteristics:
- Rib Chop: These are often considered the most premium and tender chops. They come from the rib section, close to the loin. They have a good amount of fat marbling and a visible layer of fat along the edge. The bone is usually present, adding flavor during cooking. Rib chops cook relatively quickly due to their tenderness.
- Loin Chop: This is probably the most common type. It’s cut from the loin and can include a portion of the tenderloin (a T-bone style chop) or just the loin muscle itself. Loin chops vary in thickness and fat content but are generally lean and tender. Thicker loin chops are easier to cook without overdoing them.
- Sirloin Chop: Cut from the hindquarter, these chops are flavorful but can be tougher and drier than rib or loin chops. They often have more connective tissue and less marbling. Sirloin chops benefit from slightly longer, slower cooking methods or marinating to improve tenderness. They are usually leaner.
When you’re trying to figure out How to Use Meat Thermometer for Pork Chops, the thickness of the chop is also a critical factor. A very thin chop might cook too quickly for a thermometer to be perfectly useful, while a thick chop offers more room for error and benefits greatly from temperature checks.
Choosing and Using Your Meat Thermometer
A meat thermometer is your best friend for ensuring perfectly cooked pork chops every time. It takes the guesswork out of cooking and guarantees both safety and delicious results. There are a few types of thermometers available, each with its own advantages.
The most important thing is to have a thermometer that is accurate and easy to read. For pork chops, you’ll want a thermometer that can give you a quick reading. This is especially helpful when you’re cooking thinner chops that cook very fast.
Learning to use your thermometer correctly is just as important as choosing the right one. It’s a simple process, but there are a few tips that will help you get the most accurate temperature reading. This will directly impact the outcome of your pork chops.
Types of Meat Thermometers
There are several popular types of meat thermometers, and understanding their features can help you pick the one that best suits your cooking style:
- Instant-Read Thermometers: These are digital or dial thermometers that give you a reading within seconds of being inserted into the meat. They are compact and portable, making them ideal for checking multiple chops or for cooks who are always on the go. They are excellent for precise checking of pork chops.
- Probe Thermometers (Leave-In): These thermometers have a metal probe that stays in the meat while it cooks, with a wire connecting it to a digital display unit outside the oven or grill. This allows for continuous monitoring of the internal temperature without having to open the cooking vessel, which helps maintain a consistent cooking temperature.
- Smart Thermometers: These are advanced probe thermometers that connect wirelessly to your smartphone or tablet. They often come with apps that allow you to set custom temperatures, monitor cooking progress remotely, and even receive alerts when your food is ready. They offer convenience and advanced features for serious cooks.
For beginners learning How to Use Meat Thermometer for Pork Chops, an instant-read thermometer is often the easiest to start with. It’s straightforward, affordable, and provides quick, reliable results for this specific task.
How to Use Meat Thermometer for Pork Chops: Step-by-Step
Now that you know why precise temperature is important and the tools you’ll need, let’s get to the core of How to Use Meat Thermometer for Pork Chops. This process is designed to be straightforward, ensuring you achieve delicious results without any confusion.
The key is inserting the thermometer correctly to get an accurate reading. A slight error in placement can lead to a temperature that doesn’t truly reflect the center of the chop. Following these steps will guide you to that perfect internal temperature every time.
We will cover preparing the chop, inserting the thermometer, reading the temperature, and what to do with that information. It’s a simple series of actions that lead to a fantastic meal.
Preparing Your Pork Chops and Thermometer
Before you even think about cooking, get your pork chops ready. Pat them dry with paper towels. This helps in getting a better sear when they hit the hot pan or grill.
Season them generously with salt, pepper, and any other spices you like.
Next, prepare your meat thermometer. If you’re using an instant-read digital thermometer, make sure it has fresh batteries and turn it on. Calibrate it if your model allows or if you suspect it might not be accurate.
Some thermometers come pre-calibrated, but it’s good to check.
If you are using a probe thermometer, insert the probe into the thickest part of the pork chop now, before you start cooking, ensuring it’s not touching any bone. The probe should be placed in the center of the meat. For thicker chops, you might have two potential spots to check.
Inserting the Thermometer for Accurate Readings
The most critical step in How to Use Meat Thermometer for Pork Chops is where you insert the thermometer. For an instant-read thermometer, you’ll want to insert it into the thickest part of the pork chop. Be sure to avoid touching any bone.
Bones conduct heat differently than the meat, which can give you a falsely high reading.
If the chop is very thick, you might want to check the temperature in a couple of spots to ensure it’s cooking evenly. Aim for the center of the meat, as this is the last part to cook. The probe should go in deep enough to reach the center without poking out the other side.
For probe thermometers that stay in the meat, the initial placement is crucial. Ensure the probe is fully submerged in the thickest part of the chop, away from bone and fat pockets. The wire should run out of the cooking vessel without being pinched.
Checking a Thin Pork Chop
Thin pork chops, typically less than an inch thick, cook very quickly. For these, an instant-read thermometer is your best bet. Insert it into the thickest part once you suspect they are close to done.
You might only need to check once or twice. They can go from perfect to overcooked in just a minute or two, so stay vigilant.
Checking a Thick Pork Chop
Thicker pork chops, usually an inch or more, offer more margin for error and are ideal for using a leave-in probe thermometer. Insert the probe into the center of the thickest part. If using an instant-read, you’ll check from multiple angles as it cooks.
Reading and Interpreting the Temperature
Once the thermometer is in place, wait for the reading to stabilize. For instant-read thermometers, this usually takes only a few seconds. For leave-in probes, the display will update as the temperature changes.
The target temperature for perfectly cooked pork chops is 145°F (63°C). Remember that the temperature will rise a few degrees after you remove the chop from the heat. This is called carryover cooking.
So, you want to pull the chops off the heat when they reach about 140-142°F (60-61°C).
If your thermometer reads below 140°F (60°C), the chop needs more time. Keep cooking and check again in a few minutes. If it’s already at 145°F (63°C) or slightly above, it’s time to take it off the heat and let it rest.
Resting Your Pork Chops for Juiciness
This step is often overlooked, but it’s just as vital as cooking to the correct temperature. Resting your pork chops allows the juices to redistribute throughout the meat. Without resting, those delicious juices will simply run out onto your plate the moment you cut into the chop.
Think of the muscle fibers in the meat. When you cook meat, these fibers contract and push out moisture. Resting allows them to relax and reabsorb those juices.
This leads to a much moister and more flavorful pork chop.
The amount of time you need to rest your pork chops depends on their thickness. Even a few minutes can make a noticeable difference in the final outcome. This waiting period is crucial for achieving that melt-in-your-mouth texture.
The Science of Resting Meat
During cooking, the intense heat causes the protein strands in the meat to contract, forcing moisture towards the center. This is why the center might seem juicy while the edges can be drier. This process also traps juices within the meat’s cellular structure.
When you remove the meat from the heat source, the internal temperature continues to rise slightly. This is carryover cooking. More importantly, the muscle fibers begin to relax.
As they relax, they release the trapped moisture, allowing it to spread evenly throughout the chop.
If you cut into the meat too soon, all these accumulated juices will spill out onto the cutting board or plate. This leaves the meat drier and less enjoyable. A proper rest ensures these juices are held within the chop, making it more tender and flavorful.
How Long to Rest Your Pork Chops
A general rule of thumb is to rest pork chops for at least 5 to 10 minutes after they’ve been removed from the heat. For thicker chops, you might want to let them rest for up to 15 minutes.
You can tent the pork chops loosely with aluminum foil while they rest. This helps to keep them warm without steaming them, which could make the crust soggy. Ensure the foil isn’t too tight, as this can trap steam.
This resting period is the perfect time to make a quick pan sauce or to prepare your side dishes. It ensures that when you finally serve your pork chops, they are at their absolute best.
Common Mistakes to Avoid
Even with a meat thermometer, it’s easy to make a few common mistakes that can turn a great pork chop into a disappointing one. Being aware of these pitfalls can help you avoid them and ensure success every time you cook.
These mistakes often involve impatience or misinterpreting how heat affects the meat. They can lead to either undercooked, unsafe pork or dry, tough meat. Learning to recognize and prevent them is key to mastering pork chop preparation.
Let’s look at the most frequent errors people make and how to easily sidestep them. Avoiding these will significantly boost your confidence and the quality of your cooking.
- Not Resting the Meat: As discussed, skipping the rest period is a major mistake. It directly leads to dry pork chops because the juices escape before they can be reabsorbed. Always allow at least 5 minutes for resting.
- Overcrowding the Pan: When you cook too many pork chops at once in a pan, they steam instead of sear. This prevents them from developing a nice brown crust and can lead to uneven cooking. Cook in batches if necessary, ensuring each chop has space.
- Cutting Into the Chop Too Soon: Similar to not resting, cutting to “check” if it’s done means releasing juices prematurely. Trust your thermometer and the resting period. Patience here pays off significantly in flavor and moisture.
- Ignoring Carryover Cooking: Pulling the chops off the heat only when they hit exactly 145°F can lead to overcooking, as they will continue to rise in temperature while resting. Aim to pull them off a few degrees early.
Real-Life Examples and Scenarios
Understanding How to Use Meat Thermometer for Pork Chops is best reinforced with practical examples. Seeing how it works in different situations can make the process clearer and boost your confidence.
Here are a few scenarios you might encounter, showing how a meat thermometer saves the day. These are common situations where a thermometer proves its worth, preventing common cooking mishaps.
These examples highlight the thermometer’s role from thick, challenging cuts to quick weeknight meals, showing its versatility and importance.
Scenario 1: Thick-Cut Rib Chops on the Grill
Imagine you’ve bought some beautiful, thick-cut rib pork chops, about 1.5 inches thick. You want to grill them for a nice smoky flavor. You season them well and put them on a hot grill.
- You start grilling, flipping them every few minutes to get nice grill marks.
- After about 6-7 minutes per side, you decide to check the temperature. You insert an instant-read thermometer into the thickest part of one chop, avoiding the bone.
- The thermometer reads 135°F (57°C). This is a bit lower than your target.
- You put the chops back on the grill for another 3 minutes, then check again.
- The temperature is now 142°F (61°C). You remove them from the grill, tent them loosely with foil, and let them rest for 10 minutes.
- During the rest, the temperature rises to 145°F (63°C). The chops are perfectly cooked, juicy, and tender, with a great sear.
Scenario 2: Thin Loin Chops in a Skillet
You’re making a quick weeknight dinner with thin pork loin chops, about 0.75 inches thick. You heat a skillet with some oil over medium-high heat.
- You add the chops to the hot skillet. They cook quickly, maybe 3 minutes per side.
- You use an instant-read thermometer to check the first chop. It reads 145°F (63°C) already!
- You immediately remove all the chops from the pan. Since they are thin, they likely won’t need much resting time, maybe just 3-5 minutes.
- This prevents them from overcooking. The thermometer ensured you didn’t burn them or leave them undercooked.
These examples show that knowing How to Use Meat Thermometer for Pork Chops, regardless of thickness or cooking method, is the key to success. It removes the uncertainty and guarantees a delicious outcome.
Nutritional Aspects and Pork Safety
Pork is a good source of protein and various essential nutrients. When cooked properly, it can be a healthy and delicious addition to your diet. Understanding the nutritional benefits and safety measures ensures you’re getting the most out of your pork chops.
The nutritional value of pork chops can vary based on the cut and how they are prepared. Leaner cuts will have fewer calories and less fat. The cooking method also plays a role; pan-frying in oil adds more fat than grilling or baking.
Beyond nutrition, food safety is paramount. Proper cooking temperatures are not just about taste; they are about preventing foodborne illnesses. This is where the meat thermometer becomes an indispensable tool.
Nutritional Value of Pork Chops
A typical 3-ounce serving of cooked pork loin chop is a good source of:
- Protein: Essential for building and repairing tissues. A 3-ounce serving can provide around 20-25 grams of high-quality protein.
- B Vitamins: Pork is rich in B vitamins like thiamine, niacin, riboflavin, and B6, which are crucial for energy metabolism, brain function, and red blood cell formation.
- Minerals: It also provides important minerals such as selenium (an antioxidant), phosphorus (for bones and teeth), and zinc (for immune function).
The fat content varies by cut. For instance, a rib chop might have more fat than a loin chop. Choosing lean cuts and trimming visible fat before cooking can help manage the fat and calorie intake.
A report from the National Pork Board highlighted that lean pork cuts can be as lean or leaner than chicken breast, debunking older myths about pork being a fatty meat. For example, a 3-ounce serving of trimmed pork tenderloin has about 130 calories and 3 grams of fat, making it a very lean option.
Foodborne Illnesses Associated with Pork
Historically, pork has been associated with foodborne illnesses, most notably trichinellosis, caused by the parasite Trichinella spiralis. However, due to changes in pig farming practices and improved food safety regulations, trichinellosis from commercially raised pork in developed countries is now extremely rare.
Other bacteria, such as Salmonella, Staphylococcus aureus, and Listeria monocytogenes, can also be present in raw pork. These bacteria can cause food poisoning if the meat is not handled and cooked properly. Symptoms can range from mild stomach upset to severe illness.
The USDA states that cooking pork to an internal temperature of 145°F (63°C) followed by a three-minute rest is sufficient to kill any harmful bacteria and parasites, making the meat safe to consume. This is why using a meat thermometer is not just for perfection, but for safety.
Frequently Asked Questions
Question: What is the best type of meat thermometer for pork chops?
Answer: An instant-read digital meat thermometer is generally the best for pork chops. It’s quick, accurate, and easy to use, especially for thinner chops that cook rapidly. For thicker chops, a leave-in probe thermometer can also be very useful for continuous monitoring.
Question: Do I need to rest pork chops after cooking?
Answer: Yes, resting pork chops is very important. It allows the juices to redistribute throughout the meat, resulting in a more moist and tender chop. Aim for at least 5-10 minutes of rest time.
Question: Can I cook pork chops until they are pink inside?
Answer: Yes, modern pork is safe to eat when it has a slight pink color, as long as it has reached an internal temperature of 145°F (63°C). The pinkness does not necessarily indicate it is undercooked and unsafe.
Question: How do I calibrate my meat thermometer?
Answer: Many instant-read digital thermometers don’t require calibration. If yours does, you can often calibrate it by placing the probe in boiling water. Wait until the temperature stabilizes, then use the adjustment feature on the thermometer (if available) to set it to 212°F (100°C).
Question: What if my pork chops are unevenly thick?
Answer: For unevenly thick pork chops, you should insert the thermometer into the thickest part of the chop. If one chop is significantly thicker than others, you might want to remove the thinner ones from the heat earlier as they reach temperature, and let the thicker ones continue cooking.
Final Thoughts
Mastering How to Use Meat Thermometer for Pork Chops is simpler than you think. It’s about understanding your tools and trusting the temperature. By checking the internal temperature, you guarantee safe, juicy, and delicious pork chops every time.
This skill transforms cooking from guesswork to a reliable process.

